How to schedule a live on YouTube from the panel (title, cover, date and time)
Scheduling creates the live on your YouTube channel ahead of time, with title, description, cover and a link to promote. See how to create the schedule in Destinations › YouTube › Schedules, edit it, choose whether the broadcast goes to the scheduled live or to a new one, and what happens on the day.
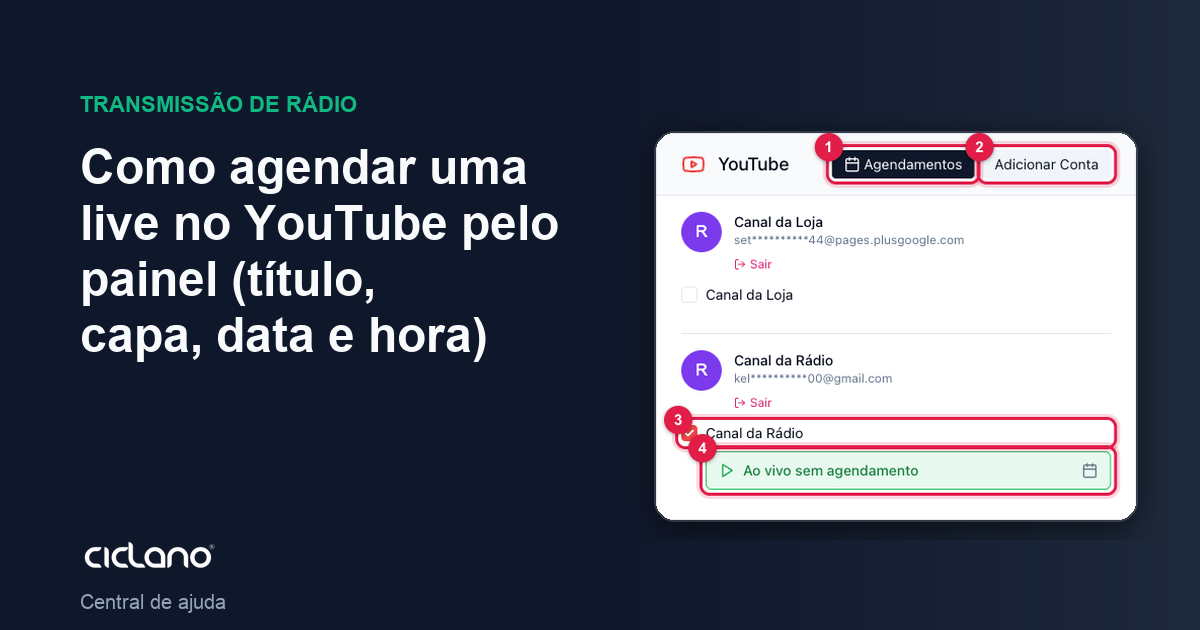
There are two ways to go live on YouTube from the panel. Without a schedule, Ciclano creates a new live on your channel the moment you click Start Transmission. With a schedule, the live already exists on the channel days before: it has a title, cover, description, date and time, and a link you promote on social media — whoever clicks sees YouTube's "Premieres on…" and gets the reminder. This article is about the second way.
Where it is: Applications › your application › Destinations › YouTube card.
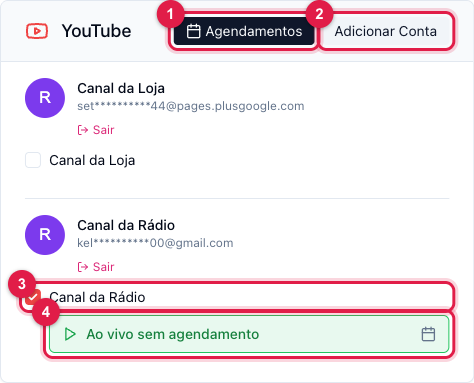
The numbers in parentheses refer to the image.
Before you start
- The YouTube account must be connected (2) and the channel checked (3). How to connect is in How to stream live to YouTube.
- Have the cover ready: 1280×720 px, JPG or PNG, up to 2 MB. Without a cover, YouTube shows a gray frame until the live starts.
- The channel must have live streaming enabled on YouTube itself (phone verification, no restrictions in the last 90 days). If YouTube refuses the schedule, the notice shows in the panel.
1. Create the schedule
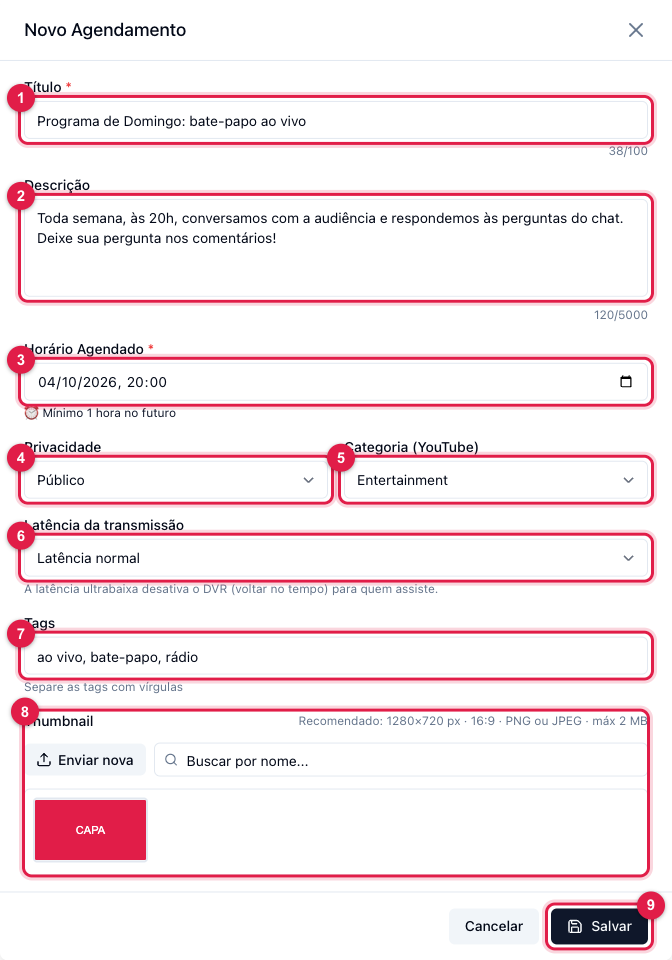
- On the YouTube card, click Schedules (1 in the first image) and then New Schedule.
- Title (1), up to 100 characters: what shows on YouTube and in search. Description (2), up to 5,000: time, links, what is going to happen.
- Scheduled Time (3): the day and time the live is set for. It must be at least 1 hour ahead; the panel refuses anything closer. The time is your computer's.
- Privacy (4): Public (shows on the channel and in search, the usual for promoting), Unlisted (only whoever has the link) or Private (only you — good for testing).
- Category (5) and Tags (7) help YouTube recommend the live. Latency (6): Normal is the most stable; Low and Ultra-low bring the delay closer to the chat, and ultra-low turns off "go back in time" for viewers.
- Thumbnail (8): click Upload new and pick the file, or search by name for a cover uploaded before (they live in Storage).
- Click Save (9). The live is created on your YouTube channel right away: it already shows in YouTube Studio and already has a link to promote.
2. The schedules list
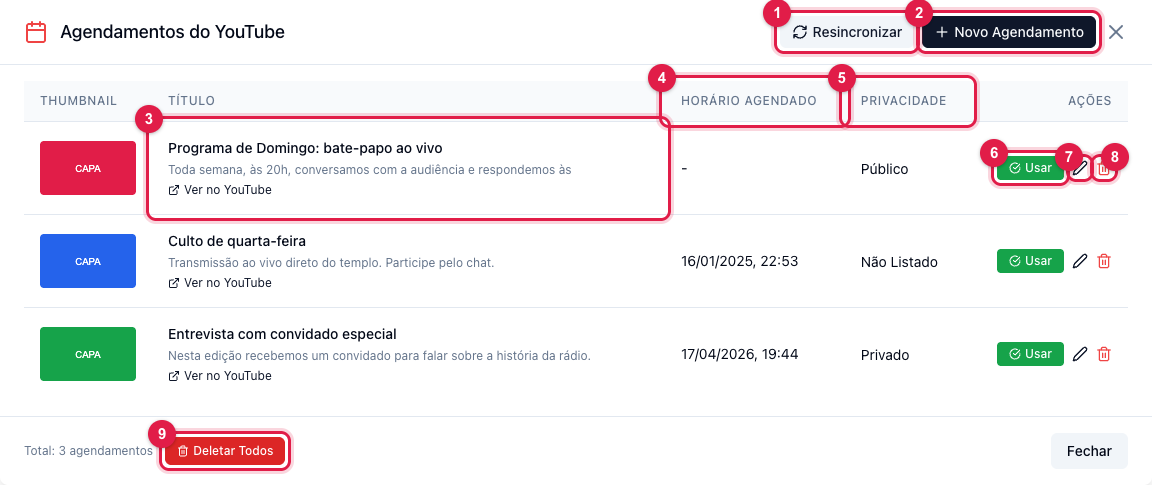
The window shows everything scheduled on the channel, including what you created directly in YouTube Studio. Resync (1) fetches again from YouTube — use it after creating or deleting something there. View on YouTube (3) opens the live in YouTube Studio, and that is where you copy the link to promote. Edit (7) opens the same form to change title, description, cover, date or privacy; the change goes to YouTube. Delete (8) removes the live from the channel — it asks for confirmation and cannot be undone; Delete All (9) removes all of them at once.
3. Tell the panel which live the broadcast goes to
Creating the schedule does not change where the signal goes: while the card selector (4 in the first image) says Live without schedule, Start Transmission creates a new live. To broadcast into the scheduled live:
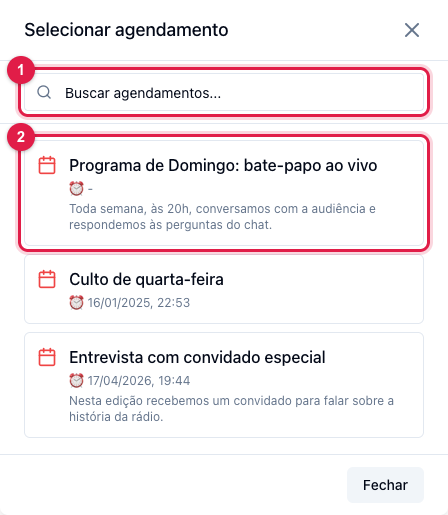
- Click Use (6) on the live's row, in the Schedules window — or click the Live without schedule selector (4) on the card and pick the live in the Select schedule window (2).
- The panel fetches that live's server and stream key from YouTube and binds the channel to it. On the card, the selector now shows the chosen live's title.
- To go back to creating a new live on every broadcast, click the X next to the title on the card: the selector returns to Live without schedule.
With a scheduled live chosen, what is in Title and Description is not used: the schedule's title, description and cover apply.
4. On the day
- Check that the channel is checked (3) and the selector shows the right live (4).
- A few minutes before the time, go to Home, click Start Transmission and start the encoder (or Live Studio). YouTube puts the live on air when the signal arrives — if you start before the scheduled time, it starts earlier; if you start after, subscribers see "starting soon" until the signal arrives.
- When you finish, stop the encoder and click Stop Transmission. The scheduled live is ended on YouTube and becomes a video on the channel.
- A YouTube live goes on air only once. For the next one, create another schedule and pick it; the previous broadcast leaves the list on its own.
What to do if…
- "Scheduled time must be at least 1 hour in the future". Pick a time further ahead. To broadcast now, use Live without schedule.
- The live I created in YouTube Studio does not show. Click Resync (1). Only lives not yet started come in.
- "YouTube session expired". The authorization expired: on the card, click Sign out on the account and connect again with Add Account; then check the channel and pick the live again.
- I went live and YouTube created another live, not the scheduled one. The selector was on Live without schedule. End it, pick the live (step 3) and start again.
- The cover did not upload. Check the size (up to 2 MB) and the format (JPG or PNG). You can also change the cover in YouTube Studio itself.